Genovese tries to compensate for the various problems that
can crop up when inexpensive cameras are used. Since they
can't fine tune pictures individually(*)
they use a computer and a negative scanner to color-balance
the image.
Very nice except for two problems: since the photos are being
printed from scans they are much lower resolution than they
would if the print were made directly from the negative, and
sometimes increasing the saturation of color can make things
that are supposed to be bland look very wrong.
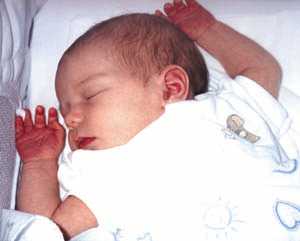 In this particular case you can see that Claire's blanket
is completely washed out and her hands are very red. I checked,
neither is true in the negative (well, in the negative her hand's
would look cyan, but you know what I mean). Since everyone who
sees the photo mentions her hands, I wanted to correct this.
In this particular case you can see that Claire's blanket
is completely washed out and her hands are very red. I checked,
neither is true in the negative (well, in the negative her hand's
would look cyan, but you know what I mean). Since everyone who
sees the photo mentions her hands, I wanted to correct this.
First selected the hand and copied it to a new layer. I
selected an area of hand and blurred it as much
as possible with the Gaussian blur filter, put the cursor over
the blurred area, and noted how much of each color there was
using the info palette. This was tricky since I then had to
undo the blurring. Then did the same thing for an area of
her arm.
What I got was hand: 161 red, 61 green, 70 blue, arm: 200 red,
135 green, 126 blue. I didn't want to adjust the red since
the hands should be a little more red than the arm. So I hid
every layer but the hand layer and selected the hand with the lasso
tool.
 Using Image|Adjust|Curves, I changed the channel to green,
placed a dot on the curve and dragged it until the input read
61 and output was 135. I then selected the blue channel and
set the input for 70 and the output to 126. This resulted in
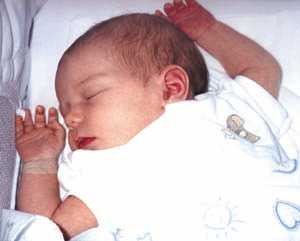
a much better looking hand.
Using Image|Adjust|Curves, I changed the channel to green,
placed a dot on the curve and dragged it until the input read
61 and output was 135. I then selected the blue channel and
set the input for 70 and the output to 126. This resulted in
a much better looking hand.
Well, except now she has that nasty line on her arm. That's why
I selected the hand, the background would have done that too if I
didn't. Unfortunately there is no sharp line between hand and arm
for me to select, so I have to gradually merge the two images.
To do that I created a mask for the hand layer and selected
the gradiant tool. Making sure the default colors were
active and the mask was selected I dragged a line from where
the red started in her hand
to the lower edge of the selected hand area.
This creates a smooth transition between the two layers and
the edge is completely invisible.
 All that was left after that was to fix the washed out blanket.
Unfortunately, the "processing" managed to completely remove
any vestiges of shadow in that area, so I didn't have much to
work with. There was a tiny bit of shadow in the red channel,
so I selected the blanket and copied the red channel onto
the green channel to darken it a bit.
All that was left after that was to fix the washed out blanket.
Unfortunately, the "processing" managed to completely remove
any vestiges of shadow in that area, so I didn't have much to
work with. There was a tiny bit of shadow in the red channel,
so I selected the blanket and copied the red channel onto
the green channel to darken it a bit.
So that's what I did. Not so horrible, was it?
Go Back to the Spud Update
(*)Actually, they do have to look at each photo
anyway since the FBI requires that all photo processing plants
inform them whenever they come across a picture of what appears
to be a crime. Remember, if you need to photograph your
crimes, make sure you have your own darkroom.
Go back.